.png?width=100&height=75&name=Untitled%20design(1).png)
Adding Participants/Administrators
PrintThere are four ways in which you can invite participants to join your mentoring programmes. These are outlined below:
Invitation Link (Recommended)
SSO Invitation Link (Recommended)
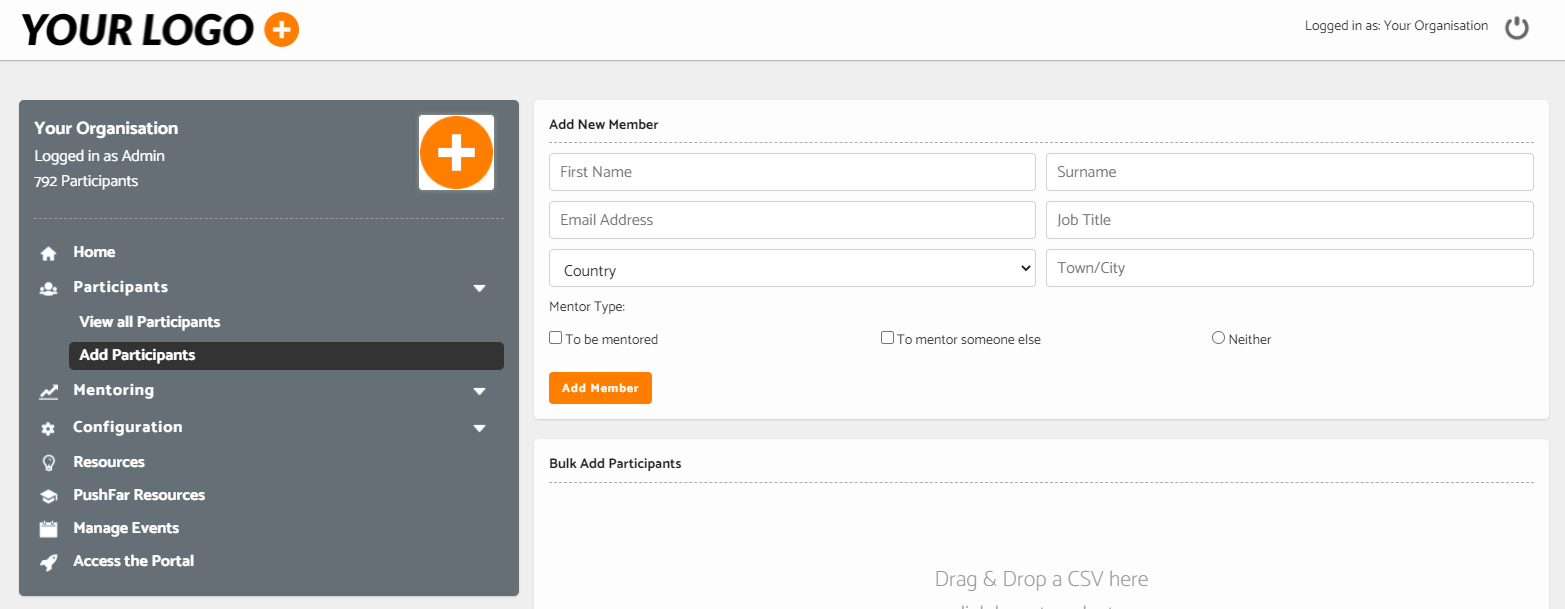
Manual Add - see image below, under ‘Add New Member’
Bulk Upload via CSV - see image below, under ‘Bulk add Participants’
The invitation links can be found on the homepage of the admin panel on the left-hand side, and these are valid if you have one mentoring group setup. If you have multiple mentoring groups, you can find unique invitation links for each group within the admin panel, under ‘mentoring’ > ‘mentoring groups’. If you are using SSO, you will have different URLs which are specific to your SSO configuration. These links can be found under ‘Configuration’ > ‘Single Sign On (SSO)’ within the menu. Here you will see the ‘SSO URL’ which should be shared with participants wishing to register using Single Sign On. There are SSO URLs at program level for mentor and/or mentee, meaning you can invite users to each programme to join as a mentor or mentee only, using SSO.
Bulk Upload by CSV
Under the 'Add Participants' section - you can include in the upload any custom registration questions you have added, as well as altering the standard PushFar attributes.
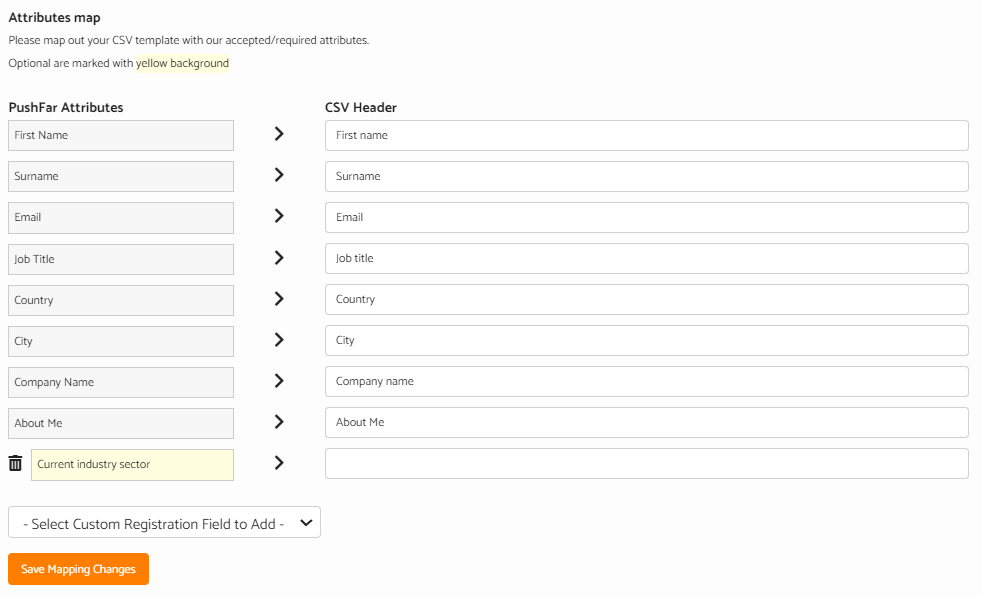
You can also map over the custom registration questions you have added to the platform, from the box above 'save mapping changes' - then you can map these over with the headings on your CSV template.
If a custom registration question is multiple choice, and you will be uploading an answer with multiple options, these must be separated with ||| per answer.
If participants are either manually added or bulk uploaded, by an administrator, they will automatically receive a welcome email with a temporary password, which they can use to then complete their registration and set a password of their choice. If you have chosen to bulk upload users, and find some users are missing/need to be added, you can reupload your CSV file once it has been updated with the missing users. Or, you can add them manually through the Admin panel.
Within your admin panel, as well as uploading CSV files with new participants, you can upload existing matches. This feature is perfect for those participants who have existing relationships already and where you'd like to bulk import these existing relationships. You can also upload CSV files with your participants mentoring preferences already within the upload, meaning they will be ready to form relationships as soon as they have been uploaded.

Quick Tip: Within the ‘invitation links’ panel, you will notice an ‘Organisation ID’. This ID can be shared with participants who have joined PushFar’s open network but would like to migrate their account to your specific programme or instance of PushFar. They can paste this into their settings to request to join your programme.
Reviewing participants
You can view a list of all registered participants, with a number of filters (such as those in a specific group) by going to ‘Participants’ > ‘View All Participants’ in the admin panel.
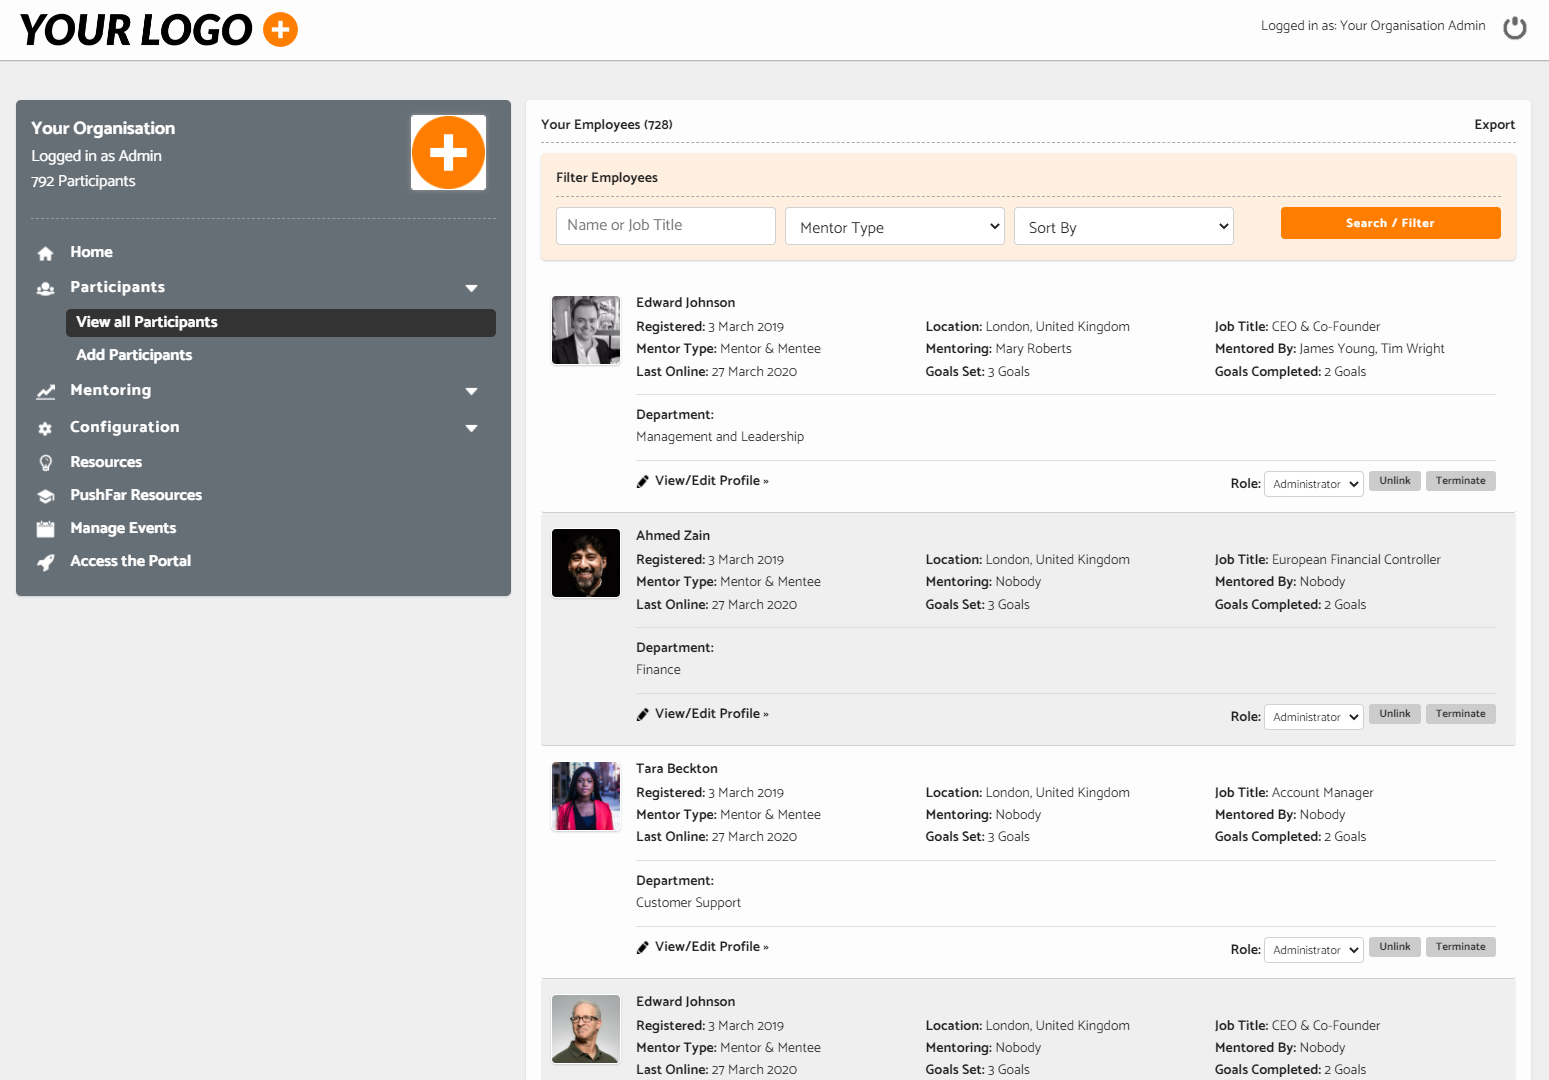
Within this view, you can export all participants by clicking ‘Export’ in the top right-hand corner. You can also view or edit any individual’s profile by clicking ‘View/Edit Profile’ in the bottom left-hand corner of the participant.
There is no time limit that someone needs to accept an invite to the platform.
You can also terminate or unlink a participant here. Terminating a member’s account will close their account and permanently delete all data relating to that individual. This is irreversible. This also can take up to 48 hours to fully complete. If you would like to re add the user, you would need to go through the registration process again as a new user.
Unlinking a member’s account will mean that they are no longer part of your organisation but be transferred across to our open mentoring network. You will no longer be able to manage a user if you unlink them.
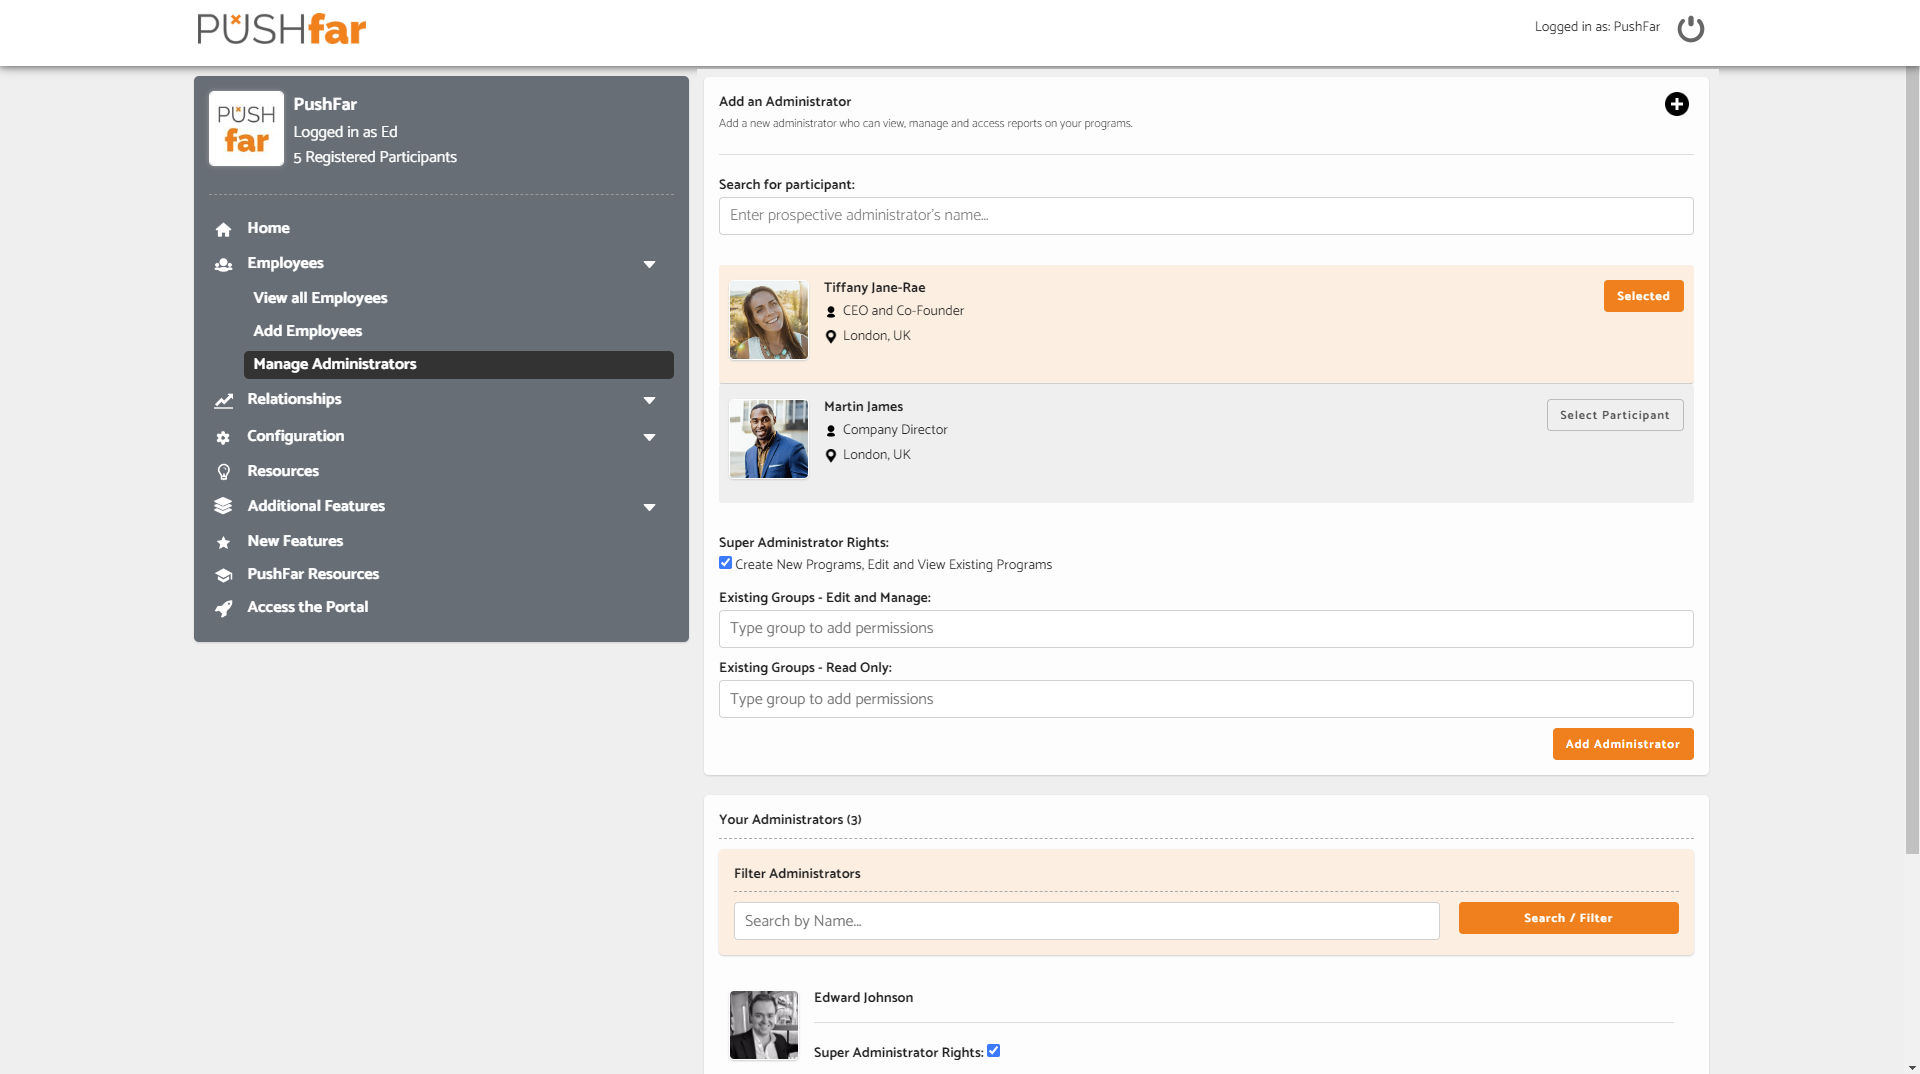
Manage Administrators
We now have a new administration management panel where you can add and amend administrative permissions at overall and group level.
Within a super-admin menu, here you can add additional participants as administrators and also include both 'Read' and 'Read and Edit' permissions for an administrator at group level.
This means that administrators don't have access to all groups and programs you are running - only the ones assigned to them. All previously set administrators have been migrated over to Super Administrator privileges in the new release.
Note - all admins can see participant data - the different roles do not limit this.
The admin permissions we have are as follows:
Super-Admin - Can view all participants, edit participant data, create and edit all mentoring programs.
Program-Level Admin - Can view all participants, edit participant data, edit programs they are assigned to and view reports of programs they are assigned to.
Program-Level Reporting - Can view all participants and view reports of mentoring programs they are assigned to.
Admin access is granted to those requested on the onboarding document and more administrator permissions can be granted within the admin panel by any existing administrator.
The default reporting by program on the homepage of the admin panel is fully aligned to admin permissions. For those with permissions limited to a single program, reporting will no longer provide those without super administrator permissions the ability to view overall platform reports.
For more on permissions, please see the FAQ’s questions.